
(coduo v1.51 compliant)
(coduo
v1.51 compliant)
Dedicated Server Setup and Usage Guide
This guide assumes you have remote access, FTP, and at least one IP to your Dedicated Server box.
|
Guide Contents |
|
|
|
Dedicated Server Installation |
Custom Mod Setup |
Punkbuster Information |
|
Adding Custom Maps |
||
|
|
||
|
|
||
|
Multiple Server Installation |
|
|
|
Server Administration |
|
|
|
|
||
|
Home PC Server Installation |
|
|
|
|
||
|
|
||
|
|
|
Patch your Call of
Duty game install to 1.5. You can get the 1.5 patch Here.
Patch your Call of Duty UO game install to 1.51. You can get the 1.51 patch
Here.
- Open C:/Program Files/on your pc, and copy/paste the Call of Duty folder to C:/ on
your hard drive. To simplify things, rename the copy to coduo.
- Download the 1.51b Server Patch from Here.
Run the patch. During the process, choose to Browse where to install
it and point it to the C:/coduo folder.
We now need to make sure your using a clean install of the server files, so
we will clean everything up next.
- Open the C:/coduo folder and delete anything you don't see here:

-
Remove anything in the 'main' folder that you don't see here:
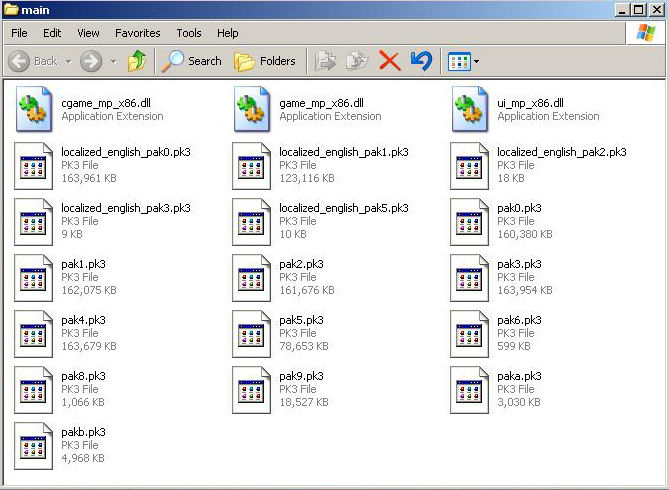
- Remove anything from the
'uo' folder that you don't see here:
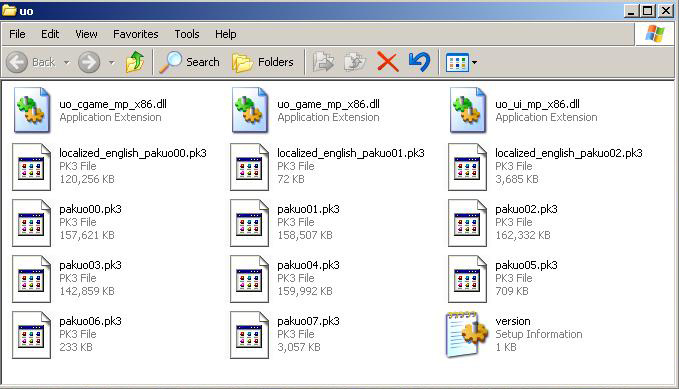
- Open the C:\coduo\pb folder and delete everything.
- Upload the coduo folder and all of its contents to C:\ on your box.
It is critical that the naming and file structure remain intact, do not change anything.
This will take quite a few hours, so time it so it does not interfere with your normal pc usage.
The next thing to do is get the Punkbuster server files.
- Login to your box and create a folder on the desktop called "pbsetup".
- Download pbsetup.exe from Evenbalance to your new pbsetup folder from this
link: PBsetup.
- Run pbsetup.exe and click "Add a Game". Choose a CoD server. You might need to browse to the CoDMP.exe file so that
pbsetup knows where your CoD server is located.
- Once you have added your CoD server, select/highlight the CoD server in the list and click "Check For Updates". This should
download a number of files to your CoD server directories. You do not have to do
anything else at this time, but you will have to add cfg's and cheat detection checks later.
- Before you do anything else, create a copy of the coduo folder using copy/paste. You will need this if you plan to run multiple servers or if something goes fubar on your server you will have a fresh copy of the files. Just copy/paste it anywhere convienient.
- Login to your box and open the coduo folder.
- Right click the CoDUOMP.exe file and select "Create Shortcut". Drag the new shortcut to the desktop.
- Right click the new shortcut and select Properties.
- Find the Target field, you will see "C:\coduo\CoDUOMP.exe"
- Add the following to the end of the existing target, do not delete or change any of the existing target!
+set dedicated 2 +set net_ip 123.456.7890 +set net_port 28960 +set sv_maxclients 32 +set sv_punkbuster 1 +exec dedicated.cfg +map_rotate
Note: Make sure there is a space between CoDUOMP.exe" and +set dedicated 2
Note: Change sv_maxclients to how many player slots you want.
Note: Change net_ip to your server ip.
Click Apply and OK.
Command Line Information
The command line is what starts your server, it sets the global variables for a server such as the IP and Port.
There are quite a few parameters you can use but I prefer to use the basics, the rest can be used in the server cfg to make
changes much easier.
This is the startup command line for the above instructions: (Windows Only)
"C:\coduo\CoDUOMP.exe" +set dedicated 2 +set net_ip 123.456.789.012 +set net_port 28960 +set
sv_maxclients 32 +set sv_punkbuster 1 +exec dedicated.cfg +map_rotate
In combination with the startup command, all you need to run a
stock server, is the cfg located here: Dedicated.cfg
Edit it to your needs, don't forget to set your rcon password and put the file in the "C:\coduo\uo"
folder of your server installation. The folder named uo.
Double click the shortcut to start the server.
Your server should now start if you didnt make any typo's or configuration errors. Wait for 10-15 minutes and go see
if you can find it in the server browser. You may need to refresh a few times.
If you can't find it, stop the server for approx. 30 minutes and try again.
You can also use your console to connect, but sometimes it won't work. Open your console using the tilde (~) key.
Type in /connect xxx.xxx.xxx.xxx (your server ip) and hit enter.
If you have your own box, chances are you need a remote start/stop tool so you don't have to
share access to the box. These are my 3 favorites:
ServerDoc (FREE - Easy install)
FireDaemon (30 Day Trial - Starts at $39 a Month)
TCAdmin (Nice GUI - Starts at $15.95 a Month)
Adding a mod is easy.
- Find the mod you wish to add to your server. Most of the time mods come with a readme file with instructions on how to install the mod.
This may differ from the following steps, but the premise is the same.
- Create a folder at the same level as your servers main directory as pictured below.
For the sake of this how to, we will call it 'mymod'. You can name it anything you want btw. (see below)
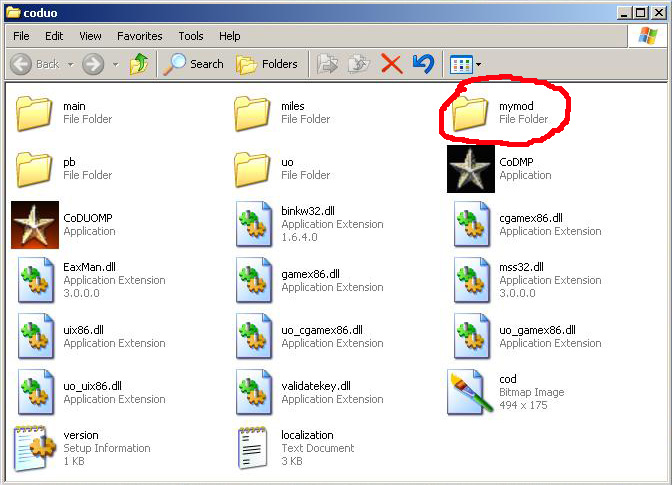
Tip: At this point, you need to read the mods readme file on how to
execute the mod. If the mod comes with its own server.cfg file, I prefer to use my own server.cfg and add the mod stuff to it. I just
open the two side by side and compare.
I usually add the differences AND execute the mod right before the Map Rotation section
of the server.cfg. Its neater, cleaner, and makes sure anything that effects any maps is loaded before the maps themselves.
- Open the server.cfg file and set the hostname, rcon password, and make any changes needed for
the mod.
- Add the new server.cfg and all the mods files to the new 'mymod' folder on your server.
In order to allow players to join your server and download the needed mod files or custom maps you are running, you need to setup a redirect to a webspace and create some file structures to faciliate the process.
- Create a folder called "coduo".(most people use coduo, you can use w/e)
- Open the "coduo" folder and create a folder called "mymod".
- Create another folder called "uo", right next to the "mymod" folder. If you plan to use
custom maps in the future, you will need this folder. (see below)

- Refer to the mods readme file if needed, and place the client side mod files (.iwd's) into the
'mymod' folder. Players need these files only, the rest is serverside.
- Upload the "coduo" folder and its contents to your websites Root directory (html folder or public_html
folder, depending on your sites setup), keeping the file structure intact.
All you need to do now is 'tell' the server where the "coduo" folder is, the
server will do the rest from there.
- In the dedicated.cfg file, scroll down to the HTTP Redirect Download section.
- Find this line and change it to the website address of the "coduo" folder you created:
seta sv_wwwBaseURL "http://www.yourwebsite.com/base_directory"
- The server will look for a folder called "coduo" at the url you specify, so for example, make the url to the download
look like this:
seta sv_wwwBaseURL "http://www.yourwebsite.com/coduo".
It is always one directory above the "uo" or "mymod" folders.
EXAMPLE
set sv_allowdownload "1"
seta sv_wwwDownload "1"
seta sv_wwwBaseURL"http://www.yourwebsite.com/coduo"
seta sv_wwwDlDisconnected "0" (IMPORTANT: Set this to "0")
NOTE: You should be able to put the url in your browser
(http://www.yourwebsite.com/coduo) and see the contents of the coduo folder, the "uo" and "mymod" folders.
If you can't view the files, you either installed the coduo folder in the wrong place, or you have a permissions problem. Discuss
permissions with your webhost if need be.
mymod will be your fs_game mod_folder.
In your command line, you will be adding this:
+set fs_game mymod
Finally, you need to change the command line to activate the mod:
+set fs_game mymod +set dedicated 2 +set net_ip 123.456.7890 +set net_port 28960 +set
sv_maxclients 32 +set sv_punkbuster 1 +exec dedicated.cfg +map_rotate
Note: Make sure there is a space between CoDUOMP.exe" and +set fs_game
Note: Change sv_maxclients to how many player slots you want.
Note: Change net_ip to your server ip.
Thats it! Just start your server.
For custom maps to download to players, you have to have the files in two places at the same
time. One set on the server, and one set on a website or file server of some sort.
Otherwise, the server will try to download the files to the player so slow that it can disconnect or timeout.
- Log into your server with FTP, and upload the map .iwd to your 'coduo/uo' folder. The folder called 'uo'.
- Open the 'coduo' folder on your webspace or redirect site that you created earlier.
- Upload the maps .iwd file to the 'cod/uo' folder, the folder called 'uo'. (see below)

- Add the map to your mapstring on the server and restart.
As long as you have the file structures correct and in the correct places, and your Redirect setup
properly, all should work as designed.
To test, jump on your server, you should get the downloads as you join. If the speed drops to
around 12-20KB/sec, your redirect is not working. Double check your setup.
Login with the admin password, and issue the map command /rcon map mapname
Add the map to your map rotation. ex. "gametype war map mp_balarda"
This option requires that you copy/paste the game install as many times as needed.
- Using the install guide, install a server and get it totally functional, including punkbuster. Join the server and make
sure screenshots, logfiles, everything is working.
Once everythings verified, stop the server.
- Open C: on your box, and create a folder called "servers", or "coduoservers", w/e you want, but i'll use "servers".
- Copy/paste the working server folder into the "servers" folder and name it coduo1, repeat naming the next one coduo2,
then coduo3, you get the idea.
This is a good time to decide a permanent naming convention for each server folder, trust me, down the road you'll be glad you did. One way is have different size servers and name them that way, coduo20, coduo24, coduo32, etc. Or, you can name them by gametype, tdm, dm, ctf, etc. So think about it for a minute, then name them.
- Create the desktop shortcuts next, naming them the same as each server, so you
can tell them apart.
- Edit the Target fields of the shortcuts, setting the command line, assigning ip's, ports, and so on.
- Edit your dedicated cfgs for each server, check/edit your PB cfg's as well.
If you have multiple IP's on your box, use one for each server. If you have one IP, just use different port numbers. E.G.
28960, 28961, 28962 etc etc.
This option uses one game file install, with custom command line settings and
individual server file sets.
- Using the install guide, install a server and get it totally functional, including punkbuster. Join the server and make sure screenshots,
logfiles, everything is working.
Once everythings verified, stop the server. You should have a working server at C:\coduo.
- On your box, open C: and create a folder called "servers".
- Open the "servers" folder, create 3 server folder sets, coduo1, coduo2, coduo3, each one containing a
"uo" folder, and a "pb" folder.
Folder - coduo1
-uo
-pb
- Add a dedicated.cfg to each 'uo' folder and PB cfg's to each pb folder.
- Open the coduo (the working game install) folder and create 3 shortcuts to CoDUOMP.exe (Step 4 of install guide), rename them
to reflect each server, and drag them to the desktop.
- Using Step 4 of the install guide as a reference, change the Target line for coduo1 to this:
C:\coduo\CoDUOMP.exe +set fs_homepath "C:/servers/coduo1" +set fs_basepath "C:/coduo" +set dedicated 2 +set
net_ip 123.456.789.012 +set net_port 28960 +set sv_maxclients 32 +set sv_punkbuster 1 +exec dedicated.cfg +map_rotate
fs_homepath = Your individual server folders you created.
(C:\servers\coduo1, coduo2, etc)
fs_basepath = Your coduo game files install. (C:\coduo)
Repeat for the other two shortcuts.
Each server will load all files on basepath, and then load all files on homepath. Each server will generate its own
logfiles, screenshots etc.
Installing Mods and Game Patches
- Mods are installed on your servers like normal ( C:\servers\coduo1\your_mod ), but you MIGHT need to install the same mod on the
game file install ( C:\coduo\your_mod ) for them to work. I have not tested this to see for sure.
- Patches for the game and punkbuster will have to be applied manually to the game files install.( C:\coduo )
Due to hundreds of different router configurations, there's no real way to guide you in the setup.
However, what I can do is give you a quick overview of what you need to do, and point you in the right direction for the information you
will need.
What you will need to do is create a static IP in your router, and then point the proper ports to that IP. You might even
try placing that IP in the DMZ zone of your router as well.
Players will connect to your server using your EXTERNAL IP from www.whatismyip.com, while you will connect to the server using the
Local option of the ingame browser.
To begin, go to this link HERE
and find your router or a close model. On the next page look for Call of Duty United Offensive, the procedure will be explained from there.
- You will need to allow the following ports:
UDP/TCP 20500
UDP/TCP 20510
UDP/TCP 20600
UDP/TCP 20610
UDP/TCP 28960
Additional Resources
http://www.olddogvt.net/cod-firewall
http://www.portforward.com
- Before you put your server online, you should try to determine how many players your server will support
with minimal lag and max performance.
Rudedog of FPSadmin.com has posted this formula that works quite well in determining server max
rate and max players:
http://www.fpsadmin.com/forum/showthread.php?t=9016
- Copy your Call of Duty folder and paste it into "C". Rename it to "coduoserver". The
path will be "C:\coduoserver"
The reason for this is simple, using your game install as the server, which you can, is a bad idea. If you need to reinstall your game for
some reason, you'll loose your server setup.
Also, you will be mixing all your server stuff with your game play stuff and it just turns into a big mess.
- Perform Steps 1, 2, 4, and 5 of the Dedicated Server Setup section. The only differences are your
not uploading any files to a box and your naming the files "coduoserver".
- If you don't know your IP, you can get it at www.whatismyip.com, write it down of course.
- Copy/paste this into notepad and save it as 'dedicated.cfg' into your "C:\coduoserver\uo" folder. The folder named uo.
Dedicated.cfg
- Open the dedicated.cfg and set your rcon password and hostname, and save.
- Create a shortcut to CoDUOMP.exe and name it coduoserver or w/e so you know what it is, and move it to your desktop.
- Right click the shortcut and choose "Properties.
- Edit the "Target" line so it looks like this, then click "Ok" and close the properties:
C:\coduoserver\CoDUOMP.exe +set dedicated 2 + set net_ip 123.456.789 +set net_port 28960 +set sv_punkbuster 1 +set sv_maxclients 8 +exec dedicated.cfg +map_rotate
Note: Make sure there is a space between CoDMP.exe" and +set dedicated 2
Note: Change sv_maxclients to how many player slots you want.
Note: Change net_ip to your ip from www.whatismyip.com.
- Your server should now start by using the shortcut you created.
- Make sure both coduoserver and CoDUOMP.exe are allowed in the Windows Firewall, under the "Exceptions" tab usually.
If you use a Norton or McAffee type software firewall, you will need to allow the same in their respective exceptions as well.
(NOTE: Sometimes you just have to turn all the firewalls off, so be prepared to do so.)
The rcon password is set in the
dedicated.cfg file, you must first login to rcon on the server before you can issue admin commands.
Join your server and open the console with the tilde key (~).
Type in '/rconpassword
yourpassword' (without the quotes) and hit Enter.
Note: Always use, and never forget, the forward slash "/" when logging in or you will broadcast your rcon password to the other
players on the server.
Note: To expand console to full screen, hold down Shift and hit the tilde (~) key.
This creates a custom shortcut directly to your server, gives you rcon, and puts you in a private slot if you have that configured in your dedicated.cfg.
Right click your MP desktop
shortcut and choose Copy.
Right click your desktop and choose Paste.
Right click your new shortcut and choose Rename.
Rename it to w/e you want it to be called.
Right click the shortcut and choose Properties.
In the Target field you will see this:
"C:\Program Files\Call of Duty\CoDUOMP.exe"
At the very end, after the quote mark, click there so you have a blinking cursor, then hit space one time.
Copy this and paste it in:
+rconpassword ***** +password ***** +connect xxx.xxx.xxx.xxx:28960"
It should look like this when done:
"C:\Program Files\Call of Duty\CoDUOMP.exe" +rconpassword ***** +password ***** +connect xxx.xxx.xxxx:28960"
Note: Replace the *****'s with your passwords for rcon and private slot.
Replace the x's with your server IP.
Note: This will take you right into the server with the last profile you selected in multiplayer.
Note: Also note that you can edit in the IP and Port and share this as is, the
rcon and password settings will be ignored.
Commonly Used Commands
|
Task |
Usage |
Example |
Description |
|---|---|---|---|
|
Logging in to rcon |
/rconpassword password |
/rconpassword superdude |
Gives player administrative rights on server. |
|
Display Server Information |
/rcon serverinfo |
/rcon serverinfo |
Shows the current server settings. |
|
Display System Information |
/rcon systeminfo |
/rcon systeminfo |
Shows the current System Information. |
|
Display Player Information |
/rcon status |
/rcon status |
Displays info for all players on the server. |
|
Change a Map |
/rcon map map_name |
/ron map mp_crash |
Loads the map specified by mapname. |
|
Rotate to Next Map |
/rcon map_rotate |
/rcon map_rotate |
Loads next map in rotation. |
|
Reload a Map |
/rcon map_restart |
/rcon map_restart |
Restarts round. Any gametype and round limit setting changes will take effect. |
|
Fast Restart a Map |
/rcon fast_restart |
/rcon fast_restart |
Restarts the current map. |
|
Execute a Config |
/rcon exec filename.cfg |
/rcon exec rifles.cfg |
Executes a Server Config File |
Other Commonly Used Commands
|
Task |
Usage |
Example |
Description |
|
Change Gametype |
/rcon g_gametype type |
/rcon g_gametype teamdeathmatch |
Sets gametype. Requires a map restart to take effect. |
|
Auto Team Balancing |
/rcon scr_teambalance [0-1] |
/rcon scr_teambalance 1 |
Force team balance off (0), on (1) |
|
Friendly Fire |
/rcon scr_friendlyfire [0-3] |
/rcon scr_friendlyfire 1 |
FF off (0), on (1), reflect (2), shared (3) |
|
Spectate Type |
/rcon scr_spectatefree [0-1] |
/rcon scr_spectatefree 0 |
Disabled (0), Free (1) |
|
Spectate Enemy |
/rcon scr_spectateenemy [0-1] |
/rcon scr_spectateenemy 0 |
Disabled (0), Enabled (1) |
|
Kill Camera |
/rcon scr_killcam [0-1] |
/rcon scr_killcam 1 |
Force killcam off (0), on (1) |
|
Private Chat to Player |
/rcon tell [client #] [message] |
/rcon tell 3 Hello Player |
Sends private message to a player. |
|
Chat Via Console |
/rcon say [message] |
/rcon say Hello Player |
Messages are shown in game preceded by console: |
Kick and Ban Commands
|
Task |
Usage |
Example |
Description |
|
Kick a Player by ID |
/rcon clientkick [ID] |
/rcon clientkick 3 |
Kick player from server by client number. |
|
Kick a Player by Name |
/rcon onlykick [Name] |
/rcon kick Playername |
Kick player by name from the server. |
|
Kick a Player by Colored Name |
/rcon kick [Name] |
/rcon kick ^1Playername |
Kick player by colored name from the
server. |
|
Kick All Players |
/rcon kick all |
/rcon kick all |
Kicks all players from server. |
|
Kick All Players |
/rcon onlykick all |
/rcon onlykick all |
Kicks all players from server. |
|
Ban a Player by ID |
/rcon banClient [ID] |
/rcon banClient 3 |
Bans a user by their client number. |
|
Ban a Player by Name |
/rcon banUser [Name] |
/rcon banUser playername |
Bans a user by their ingame name. |
|
Temp Ban a Player by ID |
/rcon tempBanClient [ID] |
/rcon tempBanClient 3 |
Kicks and temp bans player by client id from server. |
|
Temp Ban a Player by Name |
/rcon tempBanUser [Name] |
/rcon tempBanUser playername |
Kicks and temporarily bans player by name from server. |
CoD does not have an ingame admin function other than rcon commands. Between these tools and the PB
Webtool, you can perform any needed functions.
To use these tools or PB Webtool, you must minimize your game screen or run them from another pc on a home network.
Rcon Commander
Rcon Max
Modern Rcon
Half-Life Server Watch
Tatakai Server Scan
Because Punkbuster is a
server itself, it requires cfg files and commands to tell it what to
do.
It is only as good as what you configure it to do, including
running cheat detection scans and gathering screenshots.
Cheat
detection is accomplished by the use of cvar and md5 checks that you
use on the PB server.
You need to get these checks from an
anti-cheat group on the internet, such as PBbans, and
Punksbusted.
You will need to join these groups and request access
to the "private" checks they have to offer.
I suggest
you join PBBans immediately, you
can stream your logs to multiple Anti Cheat groups automatically, as
well as have live banning to your server.
PBBans
Punksbusted
Evenbalance
(PunkBuster)
Note: The included settings are a combination of public and stock settings supplied by Punkbuster.
These are links to the
Evenbalance CoD sections.
Reference:
Punkbuster
for Admins
Reference: Punkbuster
for Players
This is a link to the
Punksbusted's PB Wiki.
Reference: PsB
Wiki
This is a brief description
of the files included in the download:
pbsv.cfg
This
file is Punkbusters's server cfg file. It contains all the basic
settings for your server.
pbsvuser.cfg
This
file is used to load all the other cfg's included in the
download.
pbss.cfg
This
file contains the screenshot settings.
clan.cfg
This
is the most important file. Messages, badnames, namelock, and all the
features to PB are in here. This way you only need to edit one file
normally.
pbbans.dat
This
is the PB banlist. It is currently empty.
pbucon.use
This
file is from the live banning feature of Punkbuster. It is needed by
PBbans and certain admin tools.
Download this file and unzip
it. Download
Open
clan.cfg with Notepad and scroll to the section called PB
WEBTOOL SETTINGS.
Edit the HttpAddr with your server ip.
Just the ip, no port number. It is set at 9025.
Edit the HttpKey
line, this is your Webtool access password, use a good password,
security is everything!!
Upload all the files from the zip to your
servers 'pb' folder.
Restart your server.
You should now be able to go
to your Punkbuster Server Webtool. The url would be like this:
http://xxx.xxx.xxx:9025
The x's are your server IP, and
9025 is the port number set in the pbsv.cfg. If you get a error,
double check the url you typed in, double check the clan.cfg, and if
you still get an error contact your game server provider, perhaps
they only allow certain ports for PB.
Remember that if you find an
error and change something, you have to restart your server and check
the url again.
Assuming you can see your
Webtool, look at the bottom of the page for the version number of PB
running on your server. It should look like this: v2.013 | A1362.
The
number on the left is the server version that is running, the number
on the right is the required client version number.
Go to
Evenbalance and look at the
Call of Duty listing to see if yours is current, if not, go back to
your Webtool.
Put your password into the Webkey field and click
the "Command Screen" button.
Next, click the
"pb_sv_update" button. In about 10 minutes, come back to
the webtool, login, and click the "pb_sv_restart"
button.
Check your version number again in a few minutes, you
should be good to go.
Note: DO NOT
click the "pb_sv_writecfg" button, it will wipe out your
pbsv.cfg file.
Other
Update Methods
The cfg's in the zip file above
have the update command in them, under normal circumstances the
server will update itself.
- You can use pbsetup if you installed
it on your box, just remember to check the PB server version number
afterwards, i have had it update to the old version before.
- You
can login with rcon and execute the command /rcon
pb_sv_update. A few minutes later, you need to issue the
command /rcon pb_sv_restart.
- You
can get the server update file from Evenbalance, upload it to your
servers pb folder and restart the server, the file is located on this
page here.
-
Some server providers provide a PB Update link in their gamepanels.
There are many features to
PB, they are in the clan.cfg in the download. I will address
them in the same order as the cfg.
Note:
The brackets >[]< are not used!
pb_sv__BadName
[grace_seconds] [name-or-text] EXAMPLE - pb_sv_badname
0 www.
Adds a bad name to the server to disallow, such as
player names, or even a clan tag.
pb_sv_NameLock
[GUID or partial match] [Name to Lock]
EXAMPLE - pb_sv_NameLock
1234567890qwertyuiop "theMechanic"
This locks a
GUID to a name, anyone that trys to use that name and does not match
the GUID, will be kicked from the server.
NameLocks are not stored
to disk automatically so Admins should add these to the clan.cfg file
in order to have NameLocks extend to future server sessions.
pb_sv_powerguid
[GUID] [Powerpoints] [Name]
EXAMPLE - pb_sv_powerguid
1234567890qwertyuiop 99 theMechanic
PB Player Power works
with PBrcon to give server admins the abiltiy to have "deputy
admins" by assigning point levels and commands to each admin.
This way your server can be patroled by trusted players without
giving out the actual rcon password to the server.
In my example
above, i have 99 power points. In reality, you should only use 99
points as your top level because if someone with 100 points joins the
server, it will disable everyones power but theirs. The following is
an example of 3 power levels and a list of some of the
commands you can set:
The example levels are as
follows:
Basic - 25 Points - Kick/Screenshots
Intermediate - 50
Points - Kick/Screenshots/Say/Ban/Badname
Advanced - 99 Points -
All PB Commands
All commands are done thru console, and most commands are preceded with /pb_rcon.
So, say you want to kick a
player for using bad language.
Open console and type in pb_plist
and hit enter.
This will list the players, and next to each one is
their slot number, the player you want to kick is in slot #3.
Enter
the command like this- /pb_rcon pb_sv_COMMANDHERE PLAYERSLOT#
VARIABLE
So you would issue this command: /pb_rcon
pb_sv_kick 3 10 language
This would kick player in slot #3
for 10 minutes for language.
Each command has some different variables required, heres the shortlist explanation:
Command: pb_plist - This
will display the players, their slot number, and at least the last 8
digits of their guid.
Usage: pb_plist
Command: pb_sv_badname
[grace_seconds] [name-or-text] - This can be used for people with
foul language in their names, or to permanently ban a clan by using
their tag.
Usage: /pb_rcon pb_sv_badname 0
name-or-text
Command: pb_sv_ban [name or
slot #] [displayed_reason] [optional_private_reason] - Bans the
player and displays the reason banned to to public.
Usage:
/pb_rcon pb_sv_ban slot# reason
Command: pb_sv_getss
[player_name_or_slot#] - This will get a screenshot of a player and
put it in your CoD/pb/scrnshot folder in YOUR game install.
Usage:
/pb_rcon pb_sv_getss slot#
Command: pb_sv_kick [name or
slot #] [minutes] [displayed_reason] - This will kick a player for a
specified amount of time and display the reason to the public, see
example above.
Usage: /pb_rcon pb_sv_kick
slot# minutes reason
Command: pb_sv_rlist - This
will display all available pbRcon commands loaded onto the
server.
Usage: /pb_rcon pb_sv_rlist
This is the current list of
commands set in the clan.cfg for PBrcon and the points required for
access:
pb_sv_rcon 99 pb_sv_
pb_sv_rcon 50 pb_sv_ban
pb_sv_rcon
50 pb_sv_badname
pb_sv_rcon 50 pb_sv_say
pb_sv_rcon 25
pb_sv_map
pb_sv_rcon 25 pb_sv_mute
pb_sv_rcon 25
pb_sv_kick
pb_sv_rcon 25 pb_sv_getss
pb_sv__Task [X] [Y]
[command]
Adds a task to PB's Task List; The Task will be executed
X seconds after entry and every Y seconds thereafter; use -1 for Y if
a one-time task is desired; this can be used to execute game server
commands as well as PB commands.
For messages, what this
means is the message will load X seconds after PB starts, and repeat
every Y seconds.
This is the example message command in the
clan.cfg. 90 is X , 400 is Y, say is the command, and the message is
Welcome to our server, enjoy and have fun!
pb_sv_task
90 400 say Welcome to our server,enjoy and have fun!